Editing
Each track has an editor that can be opened using the Edit button located on the right hand side of the track. The Tempo Editor affects the tempo of MIDI tracks, and optionally audio tracks as well. The Song Editor can remove or insert parts and affects "everything" (tracks, automation, markers etc.).
All editors feature a "needle" which indicates the current transport position (its position equals the value of the transport's position indicator). The thumb at the top of the needle can be moved using the mouse. At the top of every editor is a Time Bar that shows either seconds or bars (can be changed in the Editing Options section). Clicking this bar will move the needle to the corresponding position and the transport's position indicator will be updated accordingly. You can also grab the time bar with the mouse and drag it left or right. In this case the transport position remains unchanged unless the needle moves out of the visible area. Double-clicking the time bar starts the transport, clicking stops it.
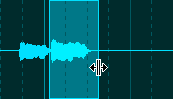
Selecting a part
A part can be selected by left-clicking the editor's display and dragging the mouse while keeping the mouse button down. The selection can be resized by dragging its beginning or end. The editor will scroll horizontally automatically if the mouse approaches the left or right side of the editor.
 |
 |
 |
 |
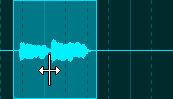
Moving or copying a part
The selected part can be moved. The part is copied if the Ctrl key (Windows) / Option key (Mac) is pressed while moving.
 |
 |
|
 |
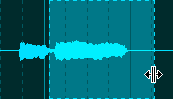
Stretching or warping a part
Resizing the selected part while the Alt key (Windows) / Command key (Mac) is pressed stretches (or shrinks) the part. The part can be 'warped' using this key as well. It's recommended to make sure any monophonic audio tracks use the monophonic transpose algorithm. Use their editor's Edit button to access this option (a part needs to be selected for this button to be enabled).
 |
 |
 |
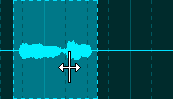 |
Tweakable Edits
MultitrackStudio features 'tweakable edits', which means that after performing an edit (for instance pasting some audio) you can tweak the edit (for instance adjust position and length of the pasted part, adjust volume, or even add effects). Every time you make an adjustment the initial edit will be completely redone, thus ensuring optimal sound quality. An edit is tweakable as long as the selected part is surrounded by a dotted line.
Common Editor features
Most editors feature the following buttons:
- Undo: Undo edit.
- Redo: Redo an edit that was undone previously.
- Delete: Deletes the selected part.
- Copy: Copies the selected part to the clipboard.
- Paste: Paste from the clipboard to the editor. The data on the clipboard will be placed at the current transport position (that's where the needle is).
- Sel All: Selects all.
In addition the "More" buttons offers:
- Cut: Copies the selected part to the clipboard and then deletes the selected part.
- Repeat: Repeats the selected part a number of times.
All editors have a popup menu with these options:
- Find Selected Part: Adjusts the transport position so the selected part becomes visible.
- Unselect
- Select Left: Select left hand part.
- Select Right: Select right hand part.
Editing Options
The editing options area at the top of the main window contains several options concerning editing.

- Time Sig / Tempo: Editing these values change the Time Signature or Tempo of the whole song (from start to end). If the tempo isn't constant throughout the song the various tempo value's will be adjusted proportionally. Right-clicking either box shows the Tempo/Time Signature Editor.
These options are available only if there is at least one MIDI track.
The down arrow next to the Tempo box offers 3 options:- Tempo / Time Signature Editor: open this editor.
- Tap Tempo: tap a new tempo on the space bar.
- Extract tempo from track: This track has to contain beats only (ie. you can't extract tempo from an album track or a guitar solo track). Typically, one will have to record a track while playing back the song. The track can be either MIDI (tap the beat on the MIDI keyboard) or audio (clap your hands to the beat, counting "one two three four" will probably work too if done "staccato"). The track containing the beats can be selected from a list containing all the song's tracks. Also, you can specify what the beats represent (quarter notes, 8th notes etc.). After extracting the tempo you can edit the Time Signature manually. Typically, the length of the first measure (#0) will be adjusted so the second measure (#1) coincides with the start of the song. This might require the use of a weird time signature like 27/4 in the first measure.
- Song Editor: shows the Song Editor.
- Ripple: When active pasted (or drag-and-dropped) parts will be inserted. Existing data will be overwritten otherwise. Ripple mode will usually be off in order to avoid misaligned tracks.
- Snap: Turning on Snap makes the start and end point of all currently selected parts snap to the (visible) grid. All subsequent mouse movements will snap to the grid as well. Use the Zoom In and Zoom Out functions to change the grid. If the grid is in bars you can click the editor grid box at the bottom of the main window to override the automatic values. Options available include swing and custom tuplets.
- Bars: Grid in bars. Also, MIDI paste and drag operations will be done in beats instead of seconds (e.g., if you move a slow part to a fast part it will be made faster).
- Follow: Editors follow transport position. You can switch this off if you want to apply some edits while the transport is running so you don't have to worry about the editor moving to the next page unexpectedly. If Follow is off the page up/down and left/right arrow keys control the editors rather than the transport position.
- Zoom In/Out: Use the Zoom In and Zoom Out functions to change the horizontal scale of the editors (all editors have the same time scale). The current scale is displayed on the bottom bar. Scale 1:1 means that one screen pixel represents one audio sample. Zooming out will put more samples on a pixel.
- Editing Options menu: provides access to various editors. If the main window is small some items from the editing options area may be moved to the menu.