Recording
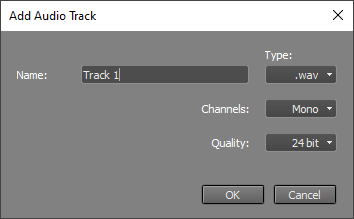
The first thing to do when starting to record a track is to add a track with an audio or MIDI file that will contain the recording. You can do this using the Add Track menu.
 |
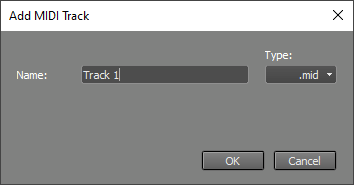 |
If the track contains an audio file (like the default .wav format), the track will record audio (using a microphone or a line input), if it contains a MIDI file (.mid) the track will record MIDI (usually a keyboard). See the Audio files and MIDI files paragraphs for more information on supported file types.
To record a track you should click its Rec button (it turns red) and start the transport.
If you want to wait a certain amount of time until recording starts (to give you time to walk to the mic for instance) you can use the Delay Before Recording option.
Recording options
Four buttons at the top of the main window provide access to the most frequently used recording options:
- Input: Show the Windows audio recording settings (Windows) / System Preferences audio settings (Mac). If your audio device comes with a control panel application you can click down arrow menu's "Browse for device control panel..." option and open the control panel. Now you can access the control panel via the down arrow menu's "Device control panel" option. If "Button shows device control panel" is checked it will pop up on clicking the Input button itself.
- Mon: Soft Monitoring
- Punch: Punch In/Out
- SoS: Sound on Sound recording
A Recording Level fader appears next to the Input button while an audio track's Rec button is engaged. This fader sets the level of all input channels. Use the Input button if you need to set per-channel levels. The Recording Level fader only appears if the sound device supports this.
The Rec button pops up the Recording Options menu which offers more options. The buttons move to the menu automatically if the main window is too small to show them all. The menu's options are described in the following paragraphs.
