New in MultitrackStudio 5
- Introduction
- .aem is the new .lst
- Multiple Solo
- Selecting multiple MIDI notes
- Multi MIDI Editor
- Limiter gain reduction in effect slot
- Large meters
- VST Output Mixer improvements
- Song Editor
- New Song window & Song Templates
- Recording
- Press any key....
- Song Versions
- To shelve or not to shelve....
- Screenshots
- Some random snippets
Note: pictures may be from a later version
1. Introduction
Version 5 is about you, the user!
A lot of work went into analyzing existing features. Should every user be able to find it? Does it trick people into doing the wrong things? Can you shoot yourself in the foot easily? Can't it do it right automatically without this knob? Does anyone really understand it anyway? The important things are now more obvious than they've ever been.
Of course there are also new features. Some address challenging situations you could find yourself in every now and then, others allow advanced users to do things quicker.
There are tons of little details of the kind that makes things easier but never makes it to the "new features" list.
The user interface has changed a bit to be more like one would expect a Windows program to be. OK buttons have moved to the bottom-right corners of the windows, and the "edit boxes requiring Enter" shouldn't confuse anyone any longer.
Version 5 comes with 5 color themes you can choose from: 3 new ones, and 2 'classic' ones having the classic looks with either dark or light editors. The new ones look more up-to-date, and do away with useless distractions like corner screws.
Hey, no worries! Version 5 isn't all that different from earlier versions. In fact it's more "MultitrackStudio" than it has ever been. It's just easier, more powerful, faster and more efficient.
2. .aem is the new .lst
The .lst file format (for edited audio files) is replaced by a new format: .aem, which allows for many audio edits to be super-fast. Existing .lst can still be opened of course.
The .lst format was based on .edit files which included the crossfades between consecutive parts. The main drawback of this is that audio files ("edit files") need to be created for every edit, even if it's just deleting a cough from a vocal track.
The new .aem files calculate the crossfades on-the-fly. Some edits now happen instantaneously (since there's no file handling involved), including:
- Delete a part
- Change volume using Edit button
- Drag/drop within a track (including dragging the whole track left or right)
Normalizing still takes some time because the part needs to be analyzed, but no edit file is created for it.
Certain edits still cause edit files to be created. These include:
- Apply fades or effects using the Edit button.
- Copy/paste between tracks.
Any edit files which are created are now plain .wav files.
Another difference is that .aem files aren't saved to disk unless you explicitly save them, while .lst files were saved every time you performed an edit. MIDI editing always used to work like this, so now audio and MIDI editing have identical save behavior. Also, you can now be sure the song is untouched if you close it without saving (this wasn't the case until now since any audio edits caused the .lst file to be updated immediately).
By the way: .aem stands for something like "audio edited multitrackstudio".
3. Multiple Solo
Multiple tracks can now be soloed simultaneously. To do this you should keep the Ctrl key down while clicking a track's Solo button.This only works with tracks (ie. you can't solo two effect returns simultaneously).
You can now solo the tracks you want to hear, instead of having to mute all other tracks.
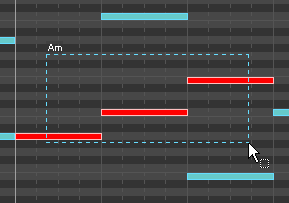
4. Selecting multiple MIDI notes
You can now select multiple notes in a MIDI editor. Not only can you do this using the Ctrl key, but using a lasso as well. You can lasso a rectangular region using the Alt key.
5. Multi MIDI Editor
The Multi MIDI Editor lets you work with multiple tracks in a single pianoroll. It can be used to work on arrangements for string or woodwind sections etc.
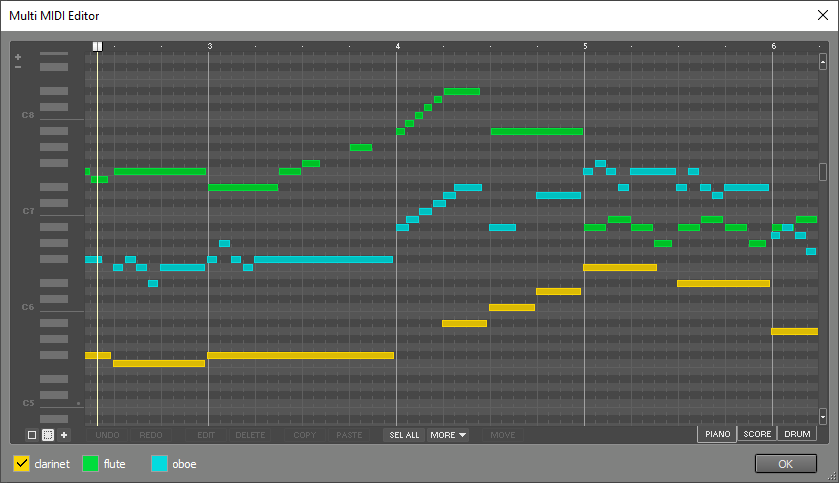
The Multi MIDI Editor affects all (MIDI) tracks that have their editor opened, just like the Multitrack Editor.
The colored buttons at the top repesent the tracks that are visible in the editor. The active one is larger and its text is bold. Any new notes you add will be in the active track. Selected notes can be moved to the active track using the Move button.
6. Limiter gain reduction in effect slot
The amount of gain reduction can now be seen right in the effect slot containing the limiter, so you can get an idea of what the limiter is doing without having to open its user interface. It appears in a modest color up to 6 dB, and in red from 6 dB on. If you see a red part in the slot it's probably time to have a look at the limiter.

7. Large meters
The level meters can now be twice as big. This happens automatically provided your monitor is sufficiently wide. There's a new button in the Preferences window for this.

8. VST Output Mixer improvements
The VST Output Mixer, which mixes down multiple-output plugins to stereo, has been improved:
- Solo and Mute buttons
- Volume faders and Pan knobs can be automated (Pro Plus edition)
- Channel numbers equal the plugin's numbers
While we're on the subject of VST plugins: the automation resolution of VSTi plugins is now 4 times as accurate. VSTi automation is now just as accurate as VST automation. Some of you might remember the 4.0 release had some missing notes problems with VSTi plugins which where quickly fixed in the 4.01 version. As a side effect VSTi automation had become 4 times less accurate. The 4.0 problem has now been solved in a different way.
9. Song Editor
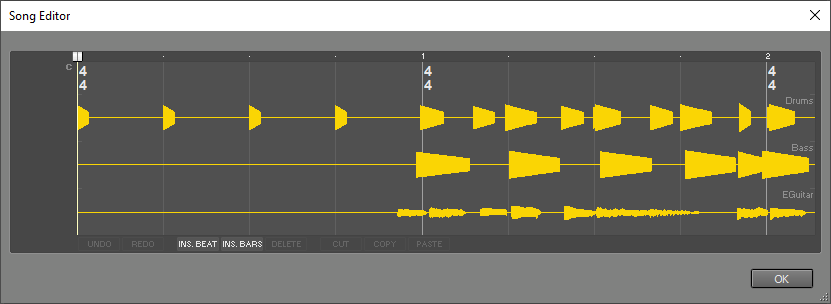
Until now there's one situation in which you're rather unfortunate in MultitrackStudio: consider a song with MIDI tempo changes, lots of automation and markers. After some time you decide bar 22 should be 4/4 instead of 3/4, and bar 37 should be removed. There's no easy way to do all this.
Enter the Song Editor! It's designed to insert or delete parts, and it affects "everything":Audio / MIDI files opened in the tracks
- Tempo and Time Signature
- Chords and Lyrics
- Markers
- Automated Fader effects
- Automation data (Pro Plus edition)
10. New Song window & Song Templates
The Song menu's New option now pops up a new New Song window. In the New Song window you can type the name of the new song. It will be placed in a folder having the same name automatically unless you browse for a folder yourself.
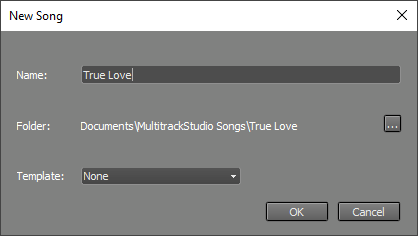
The Template box lets you apply a template. A template based on the current song can be created using the Template box as well. Templates include almost everything related to the song, except for the audio and MIDI data in the tracks. New songs will have empty audio/MIDI files. Song templates appear in the Pro Plus edition only.
11. Recording
Recording works a bit different in version 5. The main difference is that the file is no longer truncated at the point you start recording. It now works just like a tape recorder: assume you have a 3 minute song. Now start recording at 1 minute from the beginning, and record for one minute. The track's last minute is now still there. In older versions it would be gone (gone forever if it's an audio track, which is the main reason for changing it).
These recordings over existing audio/MIDI data are called "partial takes". After stopping the transport they appear in the track's editor as tweakable edits, just like punch-in recordings do. You can then tweak the start/end points of the partial take or undo the recording if you like.
Partial takes appear on the track's file options menu.
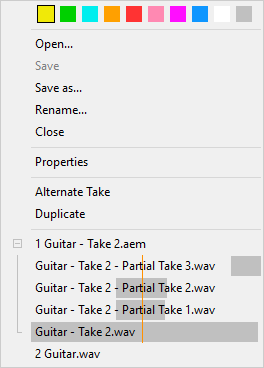
Clicking a partial take opens it in a new track. Then you can listen to it and copy any good parts using the track editors. The menu shows which part of the song is covered by a partial take in gray. The vertical blue line represents the current transport position. This makes it easy to see which partial takes might be alternatives for the part you're currently looking at.
Another new recording feature is Sound on Sound recording, which lets you record without erasing the existing part (ie. the recording is mixed with the existing part). This can be used to add some notes to an existing MIDI part. It also works with audio. The existing part is audible while recording over it, except when using an External MIDI Instrument (*).
(*) "MIDI Ports" are now called "External MIDI Instruments"
12. Press any key....
Most windows, including the main window, feature keyboard shortcuts using the Alt key. You can now do almost everything using the keyboard except editing. If you press the Alt key the shortcut characters will appear underlined. The shortcuts will hide again when the Alt key is released. The shortcut key should be pressed before the Alt key is released. In the main window, only the mixer section which has focus can be controlled using Alt shortcuts. A dot appears on the left hand side of the mixer section indicating it is focused. Tab and Shift+Tab can be used to move focus. Clicking a section (including any of its controls) will focus that section as well, so the track you're working on is typically focused automatically.The Preferences and EQ windows have a similar focus mechanism.

Volume faders and rotary knobs can be edited using Alt shortcuts as well. An edit field appears in which a new value can be typed. Pressing Enter accepts the new value, Esc discards it. Instead of typing a value you can use the up/down arrow keys to move the control. Note that you'll have to press Esc to accept this value, since Enter accepts the edit field's value.
Some examples:
Alt+F: open the track's file menu
Alt+Y: toggle the track's Play
Alt+C: toggle the track's Rec button
Alt+F1: open mixer section's first effect slot
13. Song Versions
Versions of the song can be created, and reverted to later. These versions include the song file and the MIDI and .aem files opened in the tracks. Typical applications of versions include:
- Create a version before making major changes to the song, so you can revert to the old version if it's not such a good idea after all.
- Try different mixes and store as versions. Note that you can not only change mixer settings, but edit audio and MIDI tracks as well.
- Create a version of any mixes you send to someone, just in case they later feel the old one was better.
Create Version
The Song menu's Create Version option pops up the Create Version dialog which lets you type a name for the version to be created. If there are modifications in the song which haven't been saved yet you can choose whether you want to include the modifications in the version or not. This can come in handy if you open a song and start tweaking the mix: if you think you're onto something good you can still create a version of the song as it was when you opened it, just in case the new mix appears to be not so good after all.
Revert to Version
The Song menu's Revert to Version item lists all available versions. Tooltips show information about the versions, like the date it was created. You can revert to a version by clicking it. If there's no version that equals the song in its current state a version equaling the current state will be created. These automatically created versions are named "Autosave Version 1" etc.
Autosave
Some versions are created automatically:
- Autosave (safety backup) : This version is created every 15 minutes. If the computer crashes you can open the song again and revert to this version in order to minimize the amount of work lost. The version is created when the transport is stopped.
- Autosave (discarded version) : This version is created if you choose to discard the changes when the song is closed. If you regret this you can open the song again and revert to this version.
14. To shelve or not to shelve....
The Shelf has been dismantled to make room for quicker and more obvious ways to do basic things.
While looking nice, and being rather popular, it had some drawbacks. First, all items looked equally important, which they're not. Second, adding effects required performing a rather inconvenient "U turn". Not to mention the fact that some people initially had a hard time understanding where to drag the shelf items to. And certainly not to mention the fact that the shelf folding out inadvertently was rather disturbing. Furthermore, it could be used using the mouse only, since there were no keyboard shortcuts.
So, where has it all gone?
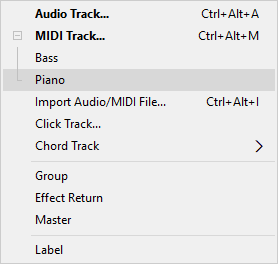
Tracks and other mixer sections can be added using the new Add Track menu, which is located next to the Song menu. This includes Labels and mixer section templates (*). You can create mixer section templates by dragging mixer sections to the Add Track button.
The effect and MIDI instrument (**) slots now have a down arrow. If you click it the effect selector pops up. The same thing happens if you rightclick the slot, just like it always did. You've seen the down arrow in paragraphs 6 and 7.
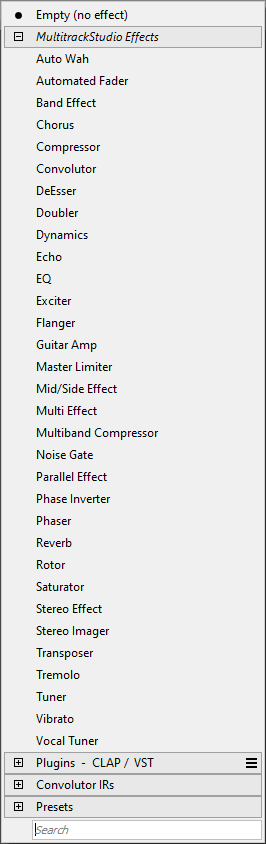
The selector combines the simplicity of the old rightclick menu with the power of 4.3's Unified Selector. Note the search box at the bottom. If you type some text all categories will open and only the effects matching the text will be shown.
All effect and MIDI instrument windows now have their own Presets button, which creates/shows presets for that particular type of effect only. All effect preset also appear in the Effect Selector.
Recent Performances now appear on the track's file options menu ("Copy live performance to clipboard").
The Garbage Bin moved down a bit: it's now on the status bar at the bottom of the window.
Note that the Add Track menu and the Garbage Bin are very close to the positions these functions had on the Shelf. So should you move the mouse to the now missing Shelf out of habit, then you're still close.
Actually, the shelf isn't completely gone: the audio/MIDI clips section is still there. The shelf no longer folds out automatically, you'll have to click the bar on the left.
(*) mixer section "presets" are now called "templates".
(**) "synths" are now called "MIDI Instruments".
15. Screenshots
OK, it's now time for some full screenshots.
Here's the Standard theme, which basically is a 2008 version of the classic theme.
Here's the Dark theme, for maximum coolness.
Here's the Light theme, for maximum accessibility.
In addition there are two Classic themes which look like earlier versions of MultitrackStudio.
16. Some random snippets
- MIDI controller editors now appear in the track editor itself instead of in a separate window.
- Disabled ("grayed out") items now show a tooltip explaining why they're disabled. This happens when the mouse is moved over the control.
- The Song menu's Save option now saves all tracks (ie. MIDI and .aem files) as well. The Save All option is removed.
- The Song menu's Save As option is removed. The new song versions feature provides a better way to have multiple versions of a song since they include MIDI and .aem files.
- The Songlist Bar now features a Play All button which can be turned off to avoid going to the next song inadvertently.
- Main window remembers position/size and whether it's maximized or not.
- The Autodetect Keyboard feature now automatically detects you're recording two tracks using two MIDI keyboards and will let you do so without you having to turn it off.
- There are now three types of MIDI quantization: "Full", "Keep Note Off" and "Keep Duration". It defaults to "Keep Note Off", which has the advantage of not destroying all musical expression (compared to the old "full" method).
- A "expand/collapse" button appears in the top-right corner of a mixer section. Rightclicking it offers more powerful options like "Expand related sections only" which appears on tracks and groups. It expands all sections contributing to the sound of the current one and collapses all other sections.
- "Song Notes" are now called "Some Comments". Track file menu's no longer have the Notes option, track notes in existing song file will appear in the Song menu's Comments window.
- Several things have been optimized in version 5:
- Audio engine is more efficient on multiple core computers.
- Streaming audio tracks from disk is more efficient.
- Track sidechaining, as introduced in version 4.3, is more efficient. (Pro Plus edition)
- Graphics optimizations.
- MIDI undo history uses less memory.
- The Songlist Properties window no longer opens all songs in order to examine them.
- Some names have changes:
- "Synths" are now called "MIDI Instruments"
- "MIDI Out Port" is now called "External MIDI Instrument"
- "Song Notes" is now "Song Comments"
- "Tape Type Monitoring" is now "Soft Monitoring"
- Mixer section "Presets" are now "Templates"
- Note "Length" is now "Duration"