Editing Audio Tracks
The track editor is displayed by clicking on the Editor Preview pane (depending on your preferences, there may also be an Edit button here). The editor displays a graphical representation of the audio signal. You can select a part using the mouse (press the left button and drag).

The two channels of a stereo track are displayed separately. Editing just one channel of a stereo track is not possible.
At the bottom of the editor, the common editor buttons appear (see Common Editor Features).
Crossfades are applied automatically to prevent clicks. These crossfades are similar to traditional tape splices.
Audio Edit Control
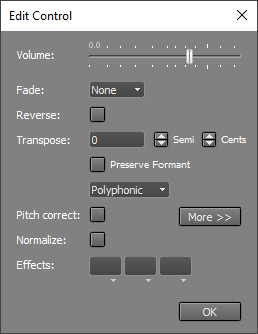 |
Audio Edit Controls offer the following features:
- Volume fader: Changes the volume of the selected part. Note: It is often better to use an Automated Fader effect to adjust volume levels, as this leaves the audio file unaltered.
- Fade: Applies a fade-in or fade-out to the selected part.
- Reverse: Reverses the selected part.
- Transpose: Pitch-shifts the audio signal by the specified number of semitones and cents. This feature is powered by Zynaptiq's ZTX technology.
Two algorithms are available: Monophonic and Polyphonic. If the audio track is monophonic (this means only one note plays at a time), you can switch to Monophonic mode, which is faster and offers better sound quality. The selected algorithm is also used for time warping and stretching.
Preserve Formant corrects the formant to make the transposed signal sound like the original (i.e., to avoid the "chipmunk" effect). - Pitch Correction: See Vocal Pitch Correction.
- Normalize: Makes the selected part as loud as possible.
Note: Normalizing introduces rounding errors, which can compromise sound quality, especially with 16-bit files. To make the final mix as loud as possible, use the Master Limiter effect instead. - Effects: The effect slots can contain audio effects.
These effect slots support ARA 2: AU / CLAP / VST3 plugins that support ARA 2 can be used here without recording audio in realtime in the plugin.
You can use these slots to apply effects that are in the track itself:
- Click SEL ALL in the track editor.
- Click EDIT to open the Audio Edit Control.
- Drag the effect(s) from the track slots to the Audio Edit Control slots.
- If needed, check for clipping. If clipping occurs, reduce the Audio Edit Control's volume slider.
Deleting Audio - Tips
You can delete a part of an audio track using the track editor's DELETE button. However, it can be more convenient to take advantage of the Tweakable Edit feature: select the part you want to delete, click the EDIT button, and drag the Volume fader all the way to the left. The part is now effectively deleted, and you can fine-tune the edit by resizing the selection.
In critical cases where deleting results in audible silence, you can paste a recording of "studio silence" instead.
Tip: Don't edit the life out of your tracks. Sounds like breathing in vocals, a singer's movement, or guitar noises add liveliness to the song. Things you hear in a soloed track may well go unnoticed in the full mix, and don't need to be removed.
Sometimes you might want to truncate a file destructively (e.g., a master file that s slightly too long), rather than turning it into a .aem file. Right click the audio track's editor and choose "Truncate File" to truncate the file at the mouse position. This option isn't available for .aem files. Note that this is a destructive operation and cannot be undone. If you're unsure, use the track editor's Export function instead.
Moving Audio by a Small Amount - Tip
For best results, press the Ctrl key (Windows) / Option key (Mac) while dragging audio by a small amount. Here's an example:
Suppose a word in a vocal track is slightly early. You can select the word, including some surrounding "studio silence", and drag it to the right. A piece of absolute silence will now appear on the left side of the selection because the original part is removed. You can get better results by pressing the Ctrl key (Windows) / Option key (Mac) while dragging. This copies the selection instead of moving it, leaving the original part in place. As a result, the background noise before the word is repeated, this is usually less noticeable than silence.
Under the hood
Audio editing is always non-destructive. This means the file containing the original recording remains unchanged. When an audio file is edited for the first time, a .aem file is created. This file references the original audio file and can reference one or more edit files as well. An edit file replaces part of the original file. Edit file names look like "trackname - Edit123456.wav", where 123456 is a unique sequence of random characters.
Example: Guitar.gjm is being edited. Guitar.aem is created. A file called "Guitar - Edit123456.wav" is created (this file contains audio data). Guitar.aem contains information about which files to play and when.
You can view the files referenced by a .aem file in a track's Properties window.
Note: Do not delete edit files manually, as this may result in lost edits or punch-in recordings. Use the Clean up Song Folder tool instead.