Master Limiter
The Master Limiter can be used to maximize the level of the mix. It's supposed to be used in the last (right hand) effect slot of the Master section.
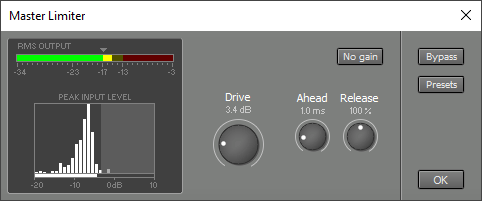 |
Drive controls the amount of amplification. This will typically be the only knob you have to use.
The Master Limiter "looks ahead into the future", so it can turn down the level before the signal peaks. Ahead controls how far the limiter will look into the future. The attack time of the limiter depends on the Ahead control (the shorter this time, the faster the attack).
Note that the output signal will be delayed by the amount of time set by the Ahead control.
The Master Limiter automatically optimizes the limiter's release time (i.e., the time it takes to turn up the level again after the signal peaks) to ensure fast release times while keeping distortion low. The Release control acts as a multiplier for this value.
The level is always limited just below the digital full-scale level (-0.3 dBFS). This small margin serves to avoid distortion in sample rate converters, CD players, soundcards etc.
The RMS Output meter indicates the perceived loudness. A pop song's chorus typically reads approx. -17 dB, which is why this level is marked by a triangle. Classical music typically reads approx. -23 dB during forte parts.
Note: the -17 dB and -23 dB levels correspond to the 0 dB levels of the K-14 and K-20 metering systems respectively. In case you wonder why -17 dB equals the K system's -14 dB: MultitrackStudio uses math textbook RMS values, whereas the K system uses AES-17 RMS values, which are 3 dB higher.
The Peak Input Level display shows the relative amount of time the input signal is at a certain level (the higher the bar, the more time). This gives you an idea of what the limiter is doing to the audio signal. There's a colored "curtain" on the right side of the display that can be moved using the mouse or the Drive knob. The vertical bars that are covered by the curtain are limited. You'd typically want to limit just a few small bars. The Peak Input Level display will be reset when either the Transport is started or the Master Limiter window pops up.
The small horizontal bar at the bottom of the Peak Statistics display shows the current input peak level.
 |
In short, setting up the Master Limiter goes like this:
- Make sure the Master Limiter's window is on screen.
- Start the transport and play a chorus. Adjust the Drive knob so the RMS Output meter reads approx. -17 dB.
- Make sure the Peak Input Level display doesn't indicate too much limiting (i.e., no large bars are behind the curtain). You may have to turn down the Drive knob a bit, or apply more compression before the Master Limiter.
The No gain button can be used while toggling the Bypass button in order to compare the sound using the Master Limiter to the sound without. The No gain button compensates for the gain that's applied by the Drive knob, so the signals have equal levels.