MIDI Pattern Editing
A pattern is a small piece of MIDI music. It typically has a size that makes sense in musical terms (e.g., a bar, two bars, or even a verse).
A plain MIDI track editor's MORE menu has an Enable Patterns option which turns the track into a pattern track. Alternatively, you can use the Add Track menu's Add MIDI Track option to create a new pattern-enabled MIDI track (make sure to set the Type box to ".mpt").
A pattern-enabled MIDI track features a Pattern Bar above the track's MIDI editor. Here you can add and move patterns.

An important feature of the MultitrackStudio pattern concept is that there can be multiple instances of a pattern, and changing the pattern will update all instances. For example, you can change a pattern-based track's drum beat by modifying just a few notes.
Another important feature is that notes belonging to a pattern can be edited directly in the track editor. These adjustments are remembered and reapplied if the pattern itself is later modified in the Pattern Editor. The changes are added to the note’s position, duration, pitch, and velocity.
Adding Patterns
To create a new pattern, click the PATTERN button and choose New Pattern. If something is selected in the track editor, the new pattern will match this area, and any selected notes will be moved to the new pattern. If nothing is selected, a new pattern will be created at the current transport position.
The PATTERN button also provides access to preset patterns. Clicking one adds it at the current transport position. Alternatively, you can drag and drop presets to the Pattern Bar. You can create your own preset patterns using the Pattern Editor.
Tip: You can create a new pattern by dropping MIDI or audio onto the Pattern Bar.
Editing the pattern arrangement
All editor buttons (EDIT, DELETE, COPY, PASTE, etc.) work as expected when one or more patterns are selected in the Pattern Bar. You can select a single pattern by clicking it. Additional patterns can be selected by clicking while pressing the Ctrl key (Windows) / Command key (Mac) key.
A new instance of the selected pattern(s) can be created in three ways:
- Drag the pattern while keeping the Ctrl key (Windows) / Option key (Mac) down to copy the pattern.
- Use copy and paste.
- Use the Repeat option.
The track editor can be used as if it's an ordinary MIDI track. Patterns that are in the selected area will be moved or removed when the selected area is moved or deleted. Editing individual notes is also possible.
Pattern Editor
The Pattern Editor can be used to edit a pattern. When a pattern is selected, the EDIT button will invoke the Pattern Editor. Alternatively, you can double-click a pattern.
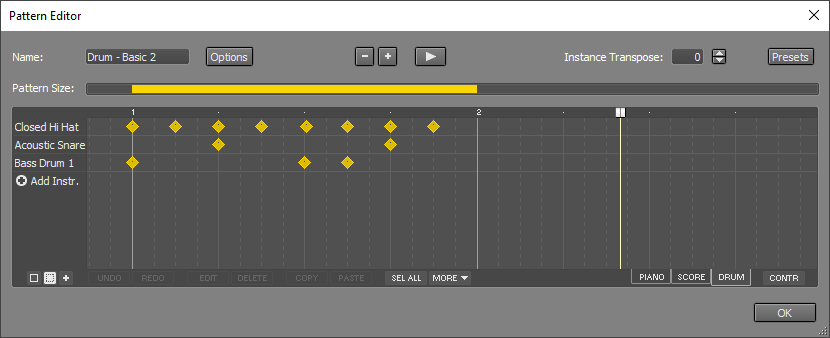
Any edits will be applied to the track immediately. You can use the Play button to loop the pattern so you can hear the results of your edits live.
The Name box contains the name of the pattern. All instances of the pattern share the same name. This name doesn't mean anything to the program, changing it to another pattern's name won't make the two patterns identical. Using the same name for different patterns is obviously a bad idea.
The Pattern Size bar determines the size of the pattern as it will appear in the track editor.
The Options button will bring up a menu with these items:
- Color: The color of this pattern (applies to all instances).
- Clone: Create a new pattern that is identical to this one. All other instances of the original pattern will remain untouched if you edit this one.
- Remove changes to this instance: Clears all changes that have been made to this instance's events using the track editor.
- Import: Import a pattern from a MIDI file.
- Export: Export the pattern to a MIDI file.
Instance Transpose can be used to transpose this instance by a number of semitones. If, for example, the pattern is in C, you can use this feature to transpose a couple of instances to F or G.